The Laboratory Lamp

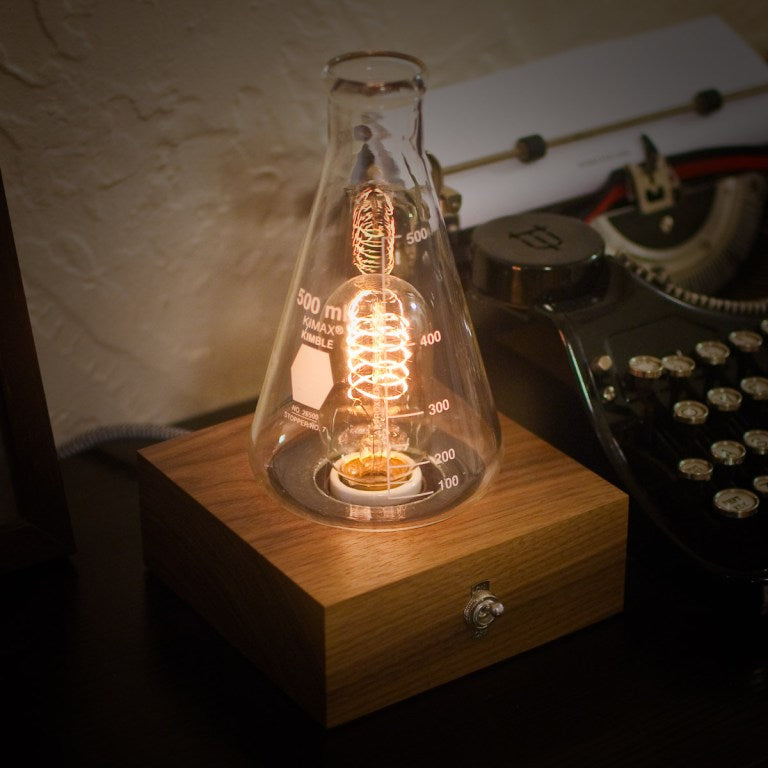
First created in 1860, the Erlenmeyer flask has come to symbolize chemistry, and by extension science as a whole. I wanted to use that symbol to create an item of functional decor, and what better for that than a lamp, with the relationship between the light bulb and the “aha!” of an idea?

Like a lot of projects, this one started with a sketch. In the scribbles below I was trying to decide between putting the switch on the top or on the side. Because putting it on top would require a larger piece of wood, I went with putting the switch on the side. It turned out, fortuitously, that having it there also made the base look more like a hot plate.

The first step was to cut the wood to size. I used the radial arm saw and set up a stop-block so I could get consistent length cuts of 5-½ inches.

The bulb needed to be centered, and there’s no easier way to find the center of a piece than by drawing two lines from corner to corner.

The base requires concentric holes galore, so for ease of alignment it’s best to start with the largest: the recess that holds the flask so it doesn’t slide around too much. For this I used a 3-½” Forstner bit.

Next up was the hole for the bulb socket. Keeping the base clamped to the drill press table, I chucked a 1-½” Forstner bit and drilled deep enough that the socket would barely peek out the top.

I flipped the base and drilled through the other side as well, leaving about 3/16″ of wood between the holes. This side is where the nuts to hold the socket would attach, and where the wiring would be routed. Next up was a 1/2″ hole for that wiring to pass from the top to the bottom of the base.

The socket had two mounting screws, and I needed to mark their positions on the wood. I put the socket into its hole, and punched the locations of the holes with a nail set (I couldn’t find my punches). In the second picture you can see the marks. I drilled these out slightly larger than the screws on the socket.


Next I found the center of the front face where the switch would be mounted, and drilled to a depth of around one inch.

The hole for the cord was similarly centered, but closer to the bottom. I drilled it about 2 inches deep.

The switch needed a lot of wood removed, and for that I went back to a Forstner bit, first setting the depth stop so I wouldn’t go all the way through and then opening up the space needed.


I used my milling machine to smooth out the opening for the switch and to cut a channel that would meet the hole I drilled for the cord.

Sanded from 60 to 320 grit, first with the random orbit sander and then by hand, and finished with three coats of a semi-gloss oil/polyurethane blend.


After being ever so patient and letting the finish dry, I bolted the socket into place, attached the switch, and wired everything up.

To keep the cord from pulling out, I locked it in place with two-part epoxy.

On the other end of the fabric-covered cord, I used a vintage-style round plug.

Two pieces of felt left to do and the base would be finished. The first was on the bottom of the base to protect both whatever surface it was resting on and the wiring.

The second was for the recess the flask sat in. I cut this with a rotary circle cutter.

The base was done!

The next part of the project was to cut a hole in the base of the flask so that it could slip over the bulb. I would need some kind of stand to hold the flask upside down for drilling.
I used an adjustable bit to cut a hole in a piece of 1×6 pine. This bit is dangerous! If you’re not paying attention you can forget that it extends inches past the center, then WHACK! Bruised —or worse — finger.

I assembled that and a couple more pieces into a simple box.

You can see here how works: put the flask into the hole and clamp the stand to the drill press table in the right location.

But where is the right location? I used a center finding tool to mark the center of the base of the flask.

With the flask in the stand, chucked a small bit into the drill press and used that to line up with the center marks.

Then I swapped that small bit for a 50mm diamond-coated hole saw and started drilling. Drilling glass requires lubrication, so I built a small dam of clay to hold a little water on the top of the flask.

Slow and steady pressure eventually breaks through!

After being rinsed and dried, it fits perfectly around the bulb in the recess I cut.

All done. I love it!


If you want your own without all the sawdust and glass chips, I’ve added a listing to my Etsy store: https://www.etsy.com/listing/268627384/the-laboratory-lamp
Leave a comment
Comments will be approved before showing up.
Also in Projects

Garbage In, Garbage Out
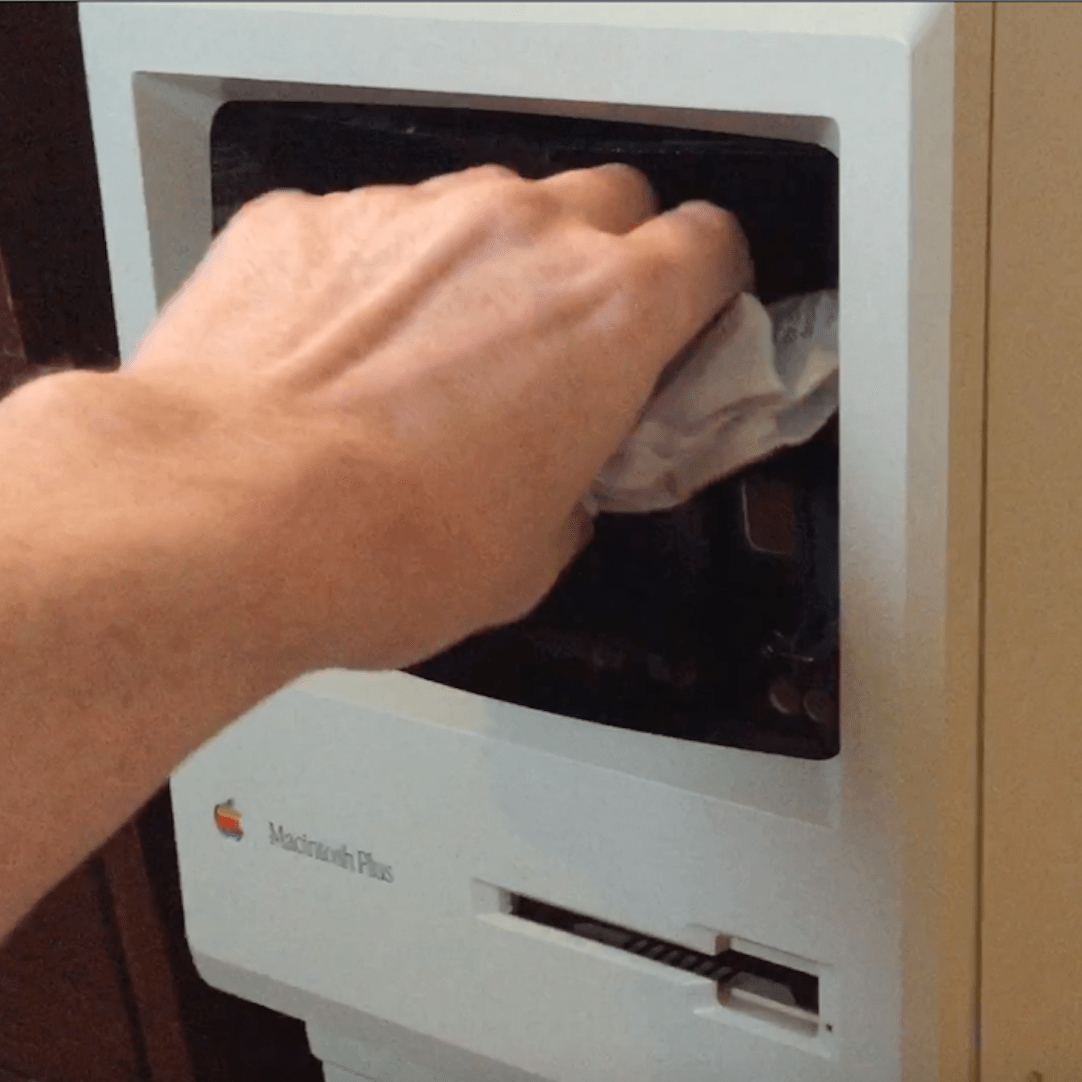
For over a decade I’ve had kicking around in my garage’s attic the cases from a couple of old original-style Macintoshes, waiting for just the right project.
One day, after staring at them stacked in my office, I realized that they had a similar form factor to the classic bullet-top garbage cans with the swinging lid. I could give one of these a new (slightly unceremonious) life as a garbage can!

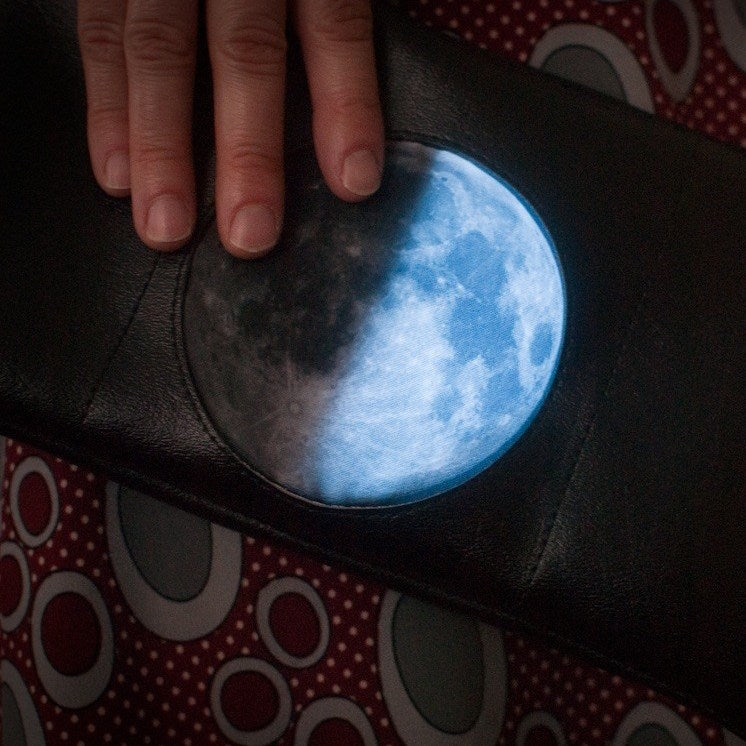
Moon Phase Purse
I’ve been going through a moon phase recently (pun absolutely intended), and thought it would be fun to make a wearable or totable that displayed the current state of the moon. There would be a bit of hardware involved, so a purse seemed like the perfect vehicle—you’re already carrying a load of other things, so there’s no harm in the addition of a small battery pack or a pile of LEDs.

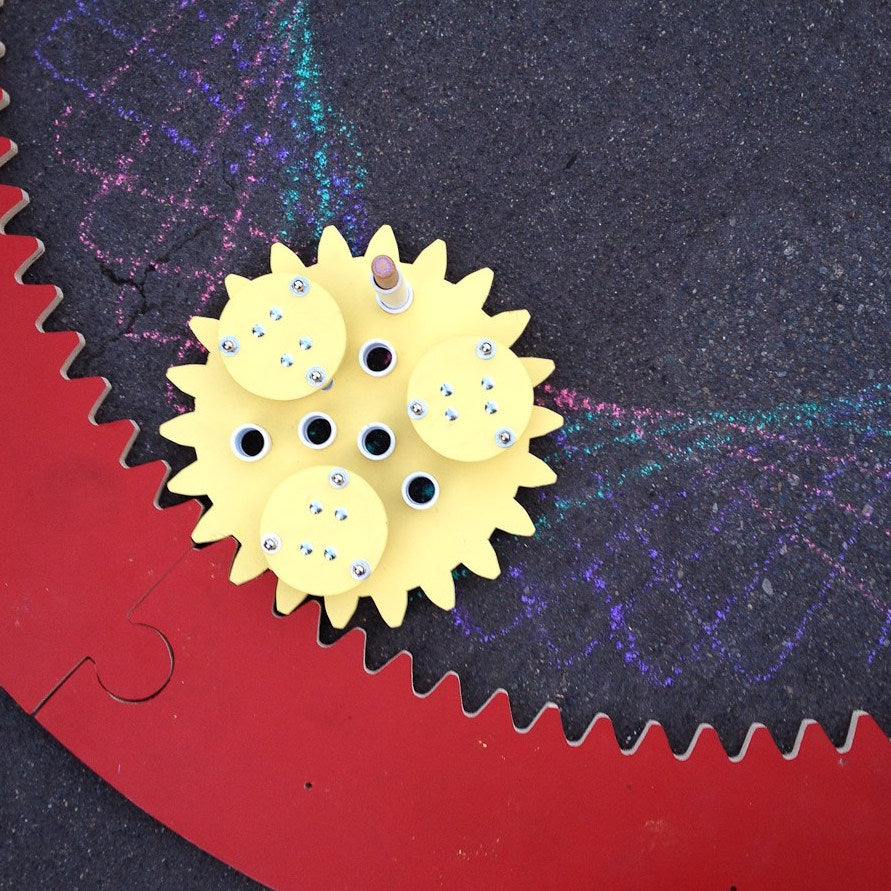
The Giant Spirograph
What’s eight feet across, has 90 teeth, and makes beautiful designs? Not a shark with an art degree, but this giant version of the classic Spirograph drawing toy. Chalk is the medium, and streets and sidewalks are the canvas.